quarta-feira, 17 de outubro de 2018

Review: BeautyBigBang Stamping Plate XL-021

Hey,
in today's post I'll review the stamping plate xl-021 from BeautyBigBang. Thanks Maggie for sending me this to review! :)
BeautyBigBang is an online store that sells nail art and makeup products. They deliver worldwide without any shipping costs.

A review de hoje da placa de estampar xl-021 da loja BeautyBigBang. Este produto foi enviado pela a loja para fazer uma review. Obrigada Maggie pela generosidade em enviar isto para review! :)
A loja BeuatyBigBang vende produtos relacionados com nail art, assim como produtos de maquilhagem! Eles enviam mundialmente sem custos de envio.

BeautyBigBang website: https://www.beautybigbang.com/

Feel free to use my code NASHI for a 10% discount on their online store!

Podem usar o meu código NASHI para um desconto de 10% em toda a loja!
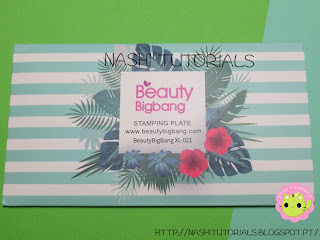

As usual, I like to start by showing the packaging of the stamping plates. BeautyBigBang has cute packaging for their stamping plates! This one has green and white stripes, with tropical flowers, even though the stamping plate has some Autumn designs. The back of the packaging has images on how to use the stamping plate.

A placa de estampar vem nesta embalagem gira e simples, com riscas verde e brancas e com flores tropicais, apesar de alguns desenhos serem de Outono.
Na parte de trás da embalagem tem instruções ilustradas em como estampar.

Stamping Plate BeautyBigBang XL-021:
Product ID:  SKU: BBBXL-021
Link: https://www.beautybigbang.com/products/leaf-theme-rectangle-nail-stamping-plate-deer-design-nail-art-tool-bbbxl-021

The stamping plate comes with a blue protective film, that should be removed. It has 14 designs, measuring 3cmx1,5cm. The stamping plate measures 12cmx6cm (with the white part the stamping plate has 12,5cmx6,5cm).
The back of the stamping plate is white and says the brand (BeautyBigBang and their website). 
A placa trás um film protector azul que tem que ser removido antes de usar.
Os desenhos desta placa são de Outono, Verão, flores e folhas.
Tem 14 desenhos, que medem 3cmx1,5cm e a placa mede 12cmx6cm (com a parte branca é  12,5cmx6,5cm).
A parte de trás é branca e diz o nome da marca (BeautyBigBang e o website). 

Here you can see the swatches of the designs. I used a gold stamping nail polish and the stamper and scraper by BeautyBigBang. The designs are well craved, you don't need to do much pressure to pick up the designs.
Esta imagem mostra os swatches da placa de estampar. Usei um verniz dourado para estampar e o stamper e scraper da BeautyBigBang.

I recommend this stamping plate! The quality is great and the designs are cute!
Recomendo esta placa de estampar! Boa qualidade e desenhos giros!

You can watch the video of this review:

Halloween Nail Art: French Tip with Black Cat and Dots

Hey,
today's tutorial is a simple French tip with a black cat and dots!
This nail art tutorial shows you a simple and easy nail art design with a white straight French tip with a black cat and orange dots. You need a nail art brush and a dotting tool.
For the third Halloween nail art I did a straight French tip in white, with a black cat and orange dots. I started by applying a base coat. Then placed tape on the nails and painted the tip in white. I removed the tape after painting the second coat. Using a nail art brush and black nail polish I drew a cat. Then using a nail art brush I did an orange bow on the cat's neck and added a small dot to make its nose. I added two small white dot for its eyes, and three orange dots on the white straight French tip. After the design has dried, I applied a top coat.

Products used:
- Flormar - Nail Care 4 in 1 Complete Care (Base Coat)
- Kiko - 101 - White French (White)
- Kiko - 275 - Black (Black)
- Kiko - 280 - Orange (Orange)
- Essence - Ultra Gloss Top Coat

Halloween Nail Art: French Tip with Black Cat and Dots
Halloween Nail Art: French Tip with Black Cat and Dots - Video

Cute Fox and Flowers Nail Art

Hey,
today's tutorial is a cute and adorable fox and flowers nail art!
This nail art tutorial shows you a cute and adorable nail art design with a fox with flowers in the head and the other four nails are a French tip with flowers. You need a nail art brush and a dotting tool.
I did a simple and cute fox and French tip with flower nail art! I started by applying base coat. I did a beige French tip on my nails except on the ring finger nail, which I painted part of a circle on the tip to the centre of the nail, using the same colour. On the same nail I draw the face and ears of the fox, using a nail art brush and an orange nail polish. While it was drying, I started drawing green leaves on my other nails and in one side of the fox's head. Then using orange, pink and peach nail polishes and a dotting tool I created flowers over the green leaves, except on the fox, which I did only a pink flower. On the fox I added two black dots for the eyes and one black dot for the nose. I added a gold dot in the centre of the flowers and outlined one side of the leaves with a darker green. After the designs have dried, I applied a top coat.

Products used:
- Flormar - Nail Care 4 in 1 Complete Care (Base Coat)
- Kiko - 003 - Beige (Beige) (Collection Soft Nudes)
- Kiko - 280 - Orange (Orange)
- Kiko - 49 - Apple Green (Green)
- Kiko - 275 - Black (Black)
- Kiko - 506 - Venus Pink (Pink)
- Kiko - 359 - Light Peach (Peach)
- Kiko - 479 - Pearly Sesame Golden (Golden)
- Kiko - 534 - Green Forest (Dark Green)
- Essence - Ultra Gloss Top Coat

Cute Fox and Flowers Nail Art
Cute Fox and Flowers Nail Art - Video

Halloween Nail Art: Polka dots and Spiderwebs

Hey,
this tutorial shows you a simple and easy Halloween nail art with polka dots and spiderwebs!
simple and easy nail art design in orange with light orange polka dots and two nails in white with black spiderwebs. You need a nail art brush and a dotting tool.
This nail art is really easy, I did in three nails orange polka dots and two nails spiderwebs. I started by applying a base coat. Then painted my nails orange and my ring and middle finger nail white. On the orange nails, using a dotting tool and a light orange nail polish I did polka dots. On my white nails, using a nail art brush and black nail polish I did spiderwebs. After it has dried, I applied a top coat.

Products used:
- Flormar - Nail Care 4 in 1 Complete Care (Base Coat)
- Kiko - 280 - Orange (Orange)
- Kiko - 101 - White French (White)
- Flormar - FC18 Salmon Sashimi (Light Orange)
- Kiko - 275 - Black (Black)
- Cien - Base & Top Coat

Halloween Nail Art: Polka dots and Spiderwebs
Halloween Nail Art: Polka dots and Spiderwebs - Video

DIY: How to Make Easy Paper Pumpkins

Hey,
today's tutorial is a DIY on how to make simple and easy paper pumpkins!
I used a circle punch, but if you don't have you can draw a circle and cut it.
You need 16 circles, then fold in half and glue one half to one half of the other circle, and so on. When all the parts are glued, you should have two parts without glue. Now using a brown cardstock make a roll and add it on the centre of the pumpkin. Close the pumpkin with hot glue.
These pumpkins are great for Autumn and Halloween.

Things you need:
- Cardstock (orange and brown)
- Circle Punch
- White Glue
- Scissors
- Hot Glue


DIY: Easy Paper Pumpkins
DIY: Easy Paper Pumpkins - Video

Flowers and Pumpkins Nail Art

Hey,
this nail art tutorial shows you a cute and simple design in gold with yellow flowers and orange pumpkins and two nails with a French tip with a yellow flower. You need a nail art brush and a dotting tool.
I wanted an Autumn/Fall nail art, I thought of flowers and pumpkins, but I wanted a French tip design too. So this nail art has two designs! I started by applying a base coat, then painted my nails gold, except the ring and middle finger which I did a white French tip. On my gold nails using a nail art brush, I drew light brown leaves, orange pumpkins and yellow flowers. On my white nails I did light brown leaves and a yellow flower. After it has dried, I applied a top coat.

Products used:
- Flormar - Nail Care 4 in 1 Complete Care (Base Coat)
- Kiko - 479 - Pearly Golden Sesame (Golden)
- Kiko - 101 - French White (White)
- Kiko - 322 - Caffe Latte (Light Brown)
- Kiko - 483 - Papaya (Orange)
- Kiko - 356 - Melon (Yellow)
- Kiko - 324 - Dark Chocolate (Dark Brown)
- Kiko - 49 - Apple Green (Green)
- Cien - Base & Top Coat

Flowers and Pumpkins Nail Art
Flowers and Pumpkins Nail Art - Video

quarta-feira, 10 de outubro de 2018

Review: Born Pretty Store Halloween Stamping Plate L005 and Halloween Nail Art: Ombre and Stamped Hats, Bats and Stars

Hey,
this post is a review of the stamping plate Halloween L005 by Born Pretty Store and an easy and simple nail art using that stamping plate! Thanks Cynthia for sending me this to review! :)
You can use my code NASHI5 for 10% discount.

O post de hoje é uma review a placa de estampar Halloween L005 da loja Born Pretty Store e uma nail art usando a placa! Obrigada Cynthia pela generosidade em enviar isto para review! :)
Podem usar o meu código NASHI5 para um desconto de 10%.

Born Pretty Store website: https://www.bornprettystore.com/


The stamping plate comes in a white and gold packaging, very simple and cute. It's like the other packaging of the other stamping plate I reviewed.
On the back it has instructions on how to use.
A placa de estampar bem nesta embalagem branca e dourada, muito simples e gira.
A parte de trás tem instruções em como usar.


Stamping Plate Halloween L005 (43664):
Link: https://www.bornprettystore.com/born-pretty-stamping-template-rectangle-nail-stamp-plate-pumpkin-witch-candy-halloween-l005-p-43664.html

This stamping plate has 26 Halloween designs, a big image (1,5cmx3,5cm), 4 medium images (1,5cmx2,5cm) and the rest are small images measuring from 0,5cm up to 1,5cm. The stamping plate measures 12cmx6cm (with the white part measures 12,5cmx6,5cm).
A placa tem 26 desenhos de Halloween, uma imagem grande, medindo 1,5cmx3,5cm, 4 imagens médias medindo cada um 1,5cmx2,5cm, o resto são imagens mais pequenas, medindo entre 0,5cm ate 1,5cm. A placa 12cmx6cm (com a parte branca mede 12,5cmx6,5cm).


Here you can see the swatches of the designs. The designs were easily picked up and stamped well on the paper and on nails.
Aqui podem ver os desenhos estampados.

I recommend this stamping plate!
Recomendo esta placa de estampar!

I did a simple nail art using this stamping plate. I started by applying a base coat, then painted my nails white. You can use tape or a cuticle guard to put around the nails. Using a fan brush and orange and purple nail polish I created an ombre/gradient design. I stamped over the ombre the hats, bats and stars design. After it has dried, I applied a top coat.

Este tutorial mostra uma nail art fácil e simples usando a placa que mostrei.

Products used:
- Flormar - Nail Care 4 in 1 Complete Care (Base Coat)
- Kiko - 203 - French Manicure White for Tips (White)
- Kiko - 280 - Orange (Orange)
- Kiko - 332 - Dark Violet (Purple)
- Born Pretty Store - BP-WN03 Throne (Black Stamping Nail Polish)
- Cien - Base & Top Coat


Halloween Nail Art: Ombre and Stamped Hats, Bats and Stars
Halloween Nail Art: Ombre and Stamped Hats, Bats and Stars - Video