quinta-feira, 26 de julho de 2018

DIY: Easy Cherry Blossom Branch Wall Art Painting (using cotton swabs)

Hey,
today's tutorial is a DIY showing you how to make an easy and cute cherry blossom branch tree wall art painting using cotton swabs!
This DIY shows you how to paint an easy and cute cherry blossom branch using cotton swabs.
The canvas I used measures 20cmx15cm, I painted it with a gradient look, the top is a darker blue and fades to a light blue, I used three colours for this a blue, light blue and white. The branch I did in black and then added a little shade mixing brown and black. The flowers I did in pink, light pink and white using cotton swabs.

Este tutorial DIY mostra uma pintura numa tela de uma ramo de cereja feito com pincel e as flores com cotonetes.

Things you need:
- Canvas (I used a 20cmx15cm)
- Acrylic Paint (Blue, Light Blue, White, Brown, Black, Pink, Light Pink)
- Brushes
- Cotton Swabs

DIY: Easy Cherry Blossom Branch Wall Art Painting (using cotton swabs)

terça-feira, 24 de julho de 2018

Fruit Nail Art: Watermelon and Tropical Leaves

Hey,
today's tutorial is the fourth design of the fruit nail art series, I did watermelons and tropical leaves.
This nail art tutorial shows you a cute and simple nail art design in pink with green tropical leaves and watermelons, with white dots. You need a nail art brush and a dotting tool.
For this fruit nail art I did watermelons and tropical leaves, with white dots. I started by applying a base coat, then painted my nails pink. Using a nail art brush and a dark green nail polish I created some tropical leaves. I did the shape of the watermelons in white first and then filled with the colours, green for the bottom and coral pink for the top, between these two colours I left a gap so a bit of white is shown. Using a dotting tool I added black dots on the watermelons and white dots around the design. After the design has dried, I applied a top coat.

Este tutorial de nail art mostra uma nail art fácil e gira em cor-de-rosa com melancias e folhas tropicais. Precisas de um pincel de nail art e um dotting tool.

You can use my code NASHI for 10% off on BeautyBigBang website!

Products used:
- Flormar - Nail Care 4 in 1 Complete Care (Base Coat)
- Cien - 9 Sweet Pink (Pink)
- Kiko - 343 - Spring Green (Dark Green)
- Kiko - 203 - French Manicure White for Tips (White)
- Kiko - 49 - Apple Green (Green)
- Cien - Flamingo Pink (Coral Pink)
- Kiko - 275 - Black (Black)
- Cien - Base & Top Coat

Fruit Nail Art: Watermelon and Tropical Leaves
Fruit Nail Art: Watermelon and Tropical Leaves - Video

Stamping Nail Art: Ombre Hibiscus

Hey,
in this post I'll show you a cute and easy nail art design using BeautyBigBang XL-001 stamping plate.
This nail art tutorial shows you a cute and simple nail art design  in pink and three nails in white with a stamped an ombre/gradient (dark pink, pink and yellow) hibiscus image using the stamping plate BBBXL-001.
I reviewed this stamping plate and I wanted something easy and cute! And great for Summer! I chose the hibiscus flower and did an ombre/gradient in dark pink, pink and yellow. I started by applying the base coat, then painted my nails white and the ring and thumb finger nail pink. On my white nails I applied liquid latex around them and stamped the hibiscus flower. I removed the liquid latex. After it has dried, I applied a top coat.

Este tutorial mostra uma nail art fácil e gira com flores hibiscus, usando a placa de estampar BeautyBigBang XL-001.

You can use my code NASHI for 10% off on BeautyBigBang website!

Products used:
- Flormar - Nail Care 4 in 1 Complete Care (Base Coat)
- Kiko - 203 - French Manicure White for Tips (White)
- Kiko - 282 - Coral Pink (Pink)
- Kiko - 066 - Fuchsia (Dark Pink)
- Cien - 3 Banana (Yellow)
- Cien - Base & Top Coat

BeautyBigBang website: https://www.beautybigbang.com/

Stamping Plate BeautyBigBang XL-002: 
Product ID: SKU: BBBXL-001
Link: https://www.beautybigbang.com/products/copy-of-flamingo-rectangle-nail-stamping-plate-tropical-fruits-leaves-theme-manicure-tool-xl-001

Stamper and Scraper: https://www.beautybigbang.com/products/2pcs-set-jelly-nail-art-stamping-metal-stamper-scraper-nail-seal-stamp-tool
Product ID: SKU: J2914TM-1A


Stamping Nail Art: Ombre Hibiscus
 Stamping Nail Art: Ombre Hibiscus - Video


quinta-feira, 19 de julho de 2018

Review: BeautyBigBang Stamping Plate XL-001

Hey,
today's post is the review of the BeautyBigBang Stamping Plate XL-001 from BeautyBigBang. Thanks Maggie for sending me this to review! :)
BeautyBigBang is an online store that sells nail art and makeup products. They deliver worldwide without any shipping costs.

A review de hoje é a placa de estampar BeautyBigBang XL-001 da loja BeautyBigBang. Este produto foi enviado pela a loja para fazer uma review. Obrigada Maggie pela generosidade em enviar isto para review! :)
A loja BeuatyBigBang vende produtos relacionados com nail art, assim como produtos de maquilhagem! Eles enviam mundialmente sem custos de envio.

BeautyBigBang website: https://www.beautybigbang.com/

Feel free to use my code NASHI for a 10% discount on their online store!
Podem usar o meu código NASHI para um desconto de 10% em toda a loja!

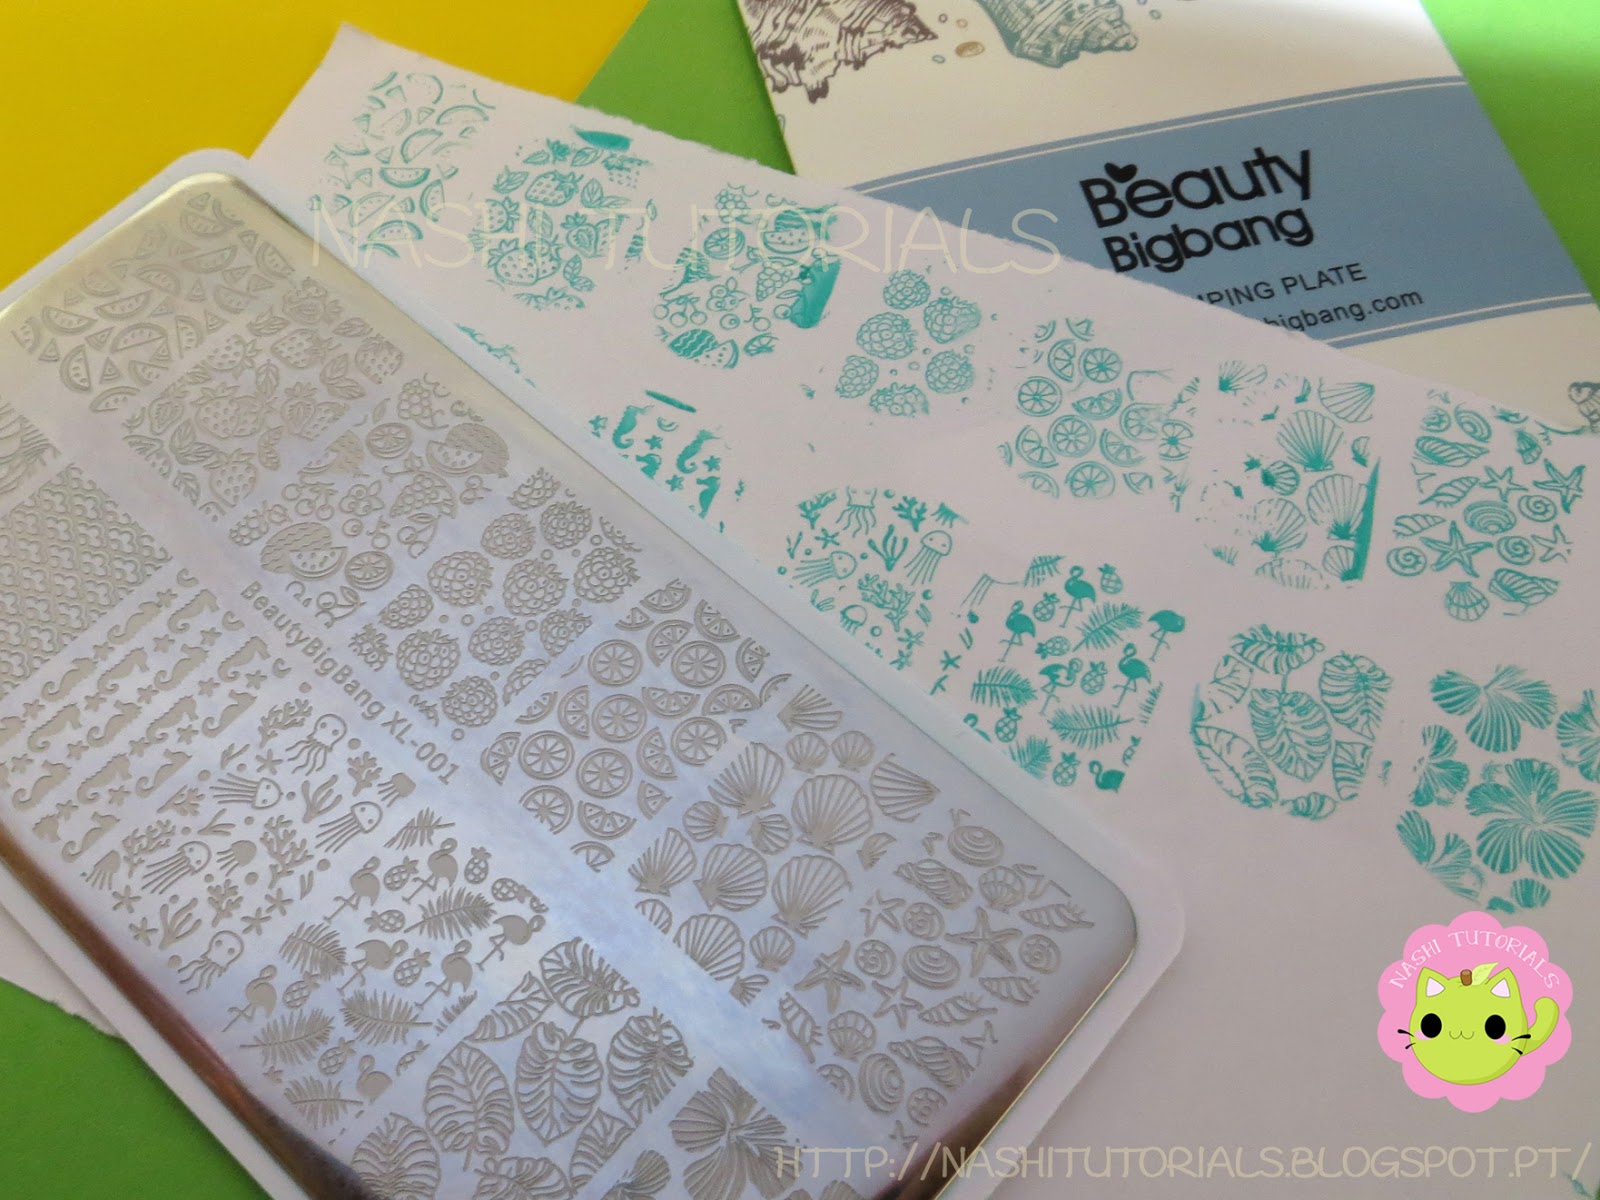
The stamping plate comes in this packaging, it has seashells and starfishes on it, but the stamping plate has tropical and fruit designs!
The back of the packaging has easy image instruction on how to use the stamping plate.
A placa de estampar vem nesta embalagem muito gira, com conchas e estrelas-do-mar, mas a placa de estampar tem desenhos tropicais e frutas!
A parte de trás da embalagem tem instruções ilustradas em como estampar.


This stamping plate is about Summer too, but the designs are related with tropical leaves and fruit, and two designs with seashells.
It comes with the blue protective film, which should be removed before you stamp.
It has 14 designs, measuring 3cmx1,5cm each design and the stamping plate measures 12cmx6cm (with the white part the stamping plate has 12,5cmx6,5cm).
The back of the stamping plate is white and says the brand (BeautyBigBang and their website).
Os desenhos da placa são de Verão também, mas mais com frutas e folhas tropicais e dois desenhos são de conchas! Tem 14 desenhos medindo 3cmx1,5cm e a placa mede 12cmx6cm (com a parte branca é  12,5cmx6,5cm)
A parte de trás é branca e diz o nome da marca (BeautyBigBang e o website). 


Stamping Plate BeautyBigBang XL-001:
Product ID:  SKU: BBBXL-001
Price: 5,16€/4,61£/5,99$ (On sale: 3,09€/2,76£/3,59$) The price may change!


You can see the swatches of the designs. I used a Kiko nail polish (343 - Spring Green, it's a regular nail polish, but stamped great, even though I couldn't pick up two designs) and the stamper and scraper are by BeautyBigBang.
Esta imagem mostra os swatches da placa de estampar. Usei um verniz normal, da Kiko (343 - Spring Green) e o stamper e scraper da BeautyBigBang.


I recommend this stamping plate! Great quality and pretty designs!
Recomendo esta placa de estampar! Boa qualidade e desenhos giros!

You can watch the video of this review:


quarta-feira, 18 de julho de 2018

DIY: Crepe Paper Flowers - Roses

Hey,
today's video is a DIY showing you how to make easy and simple crepe paper roses!
This DIY shows you a simple and easy way on how to make roses using crepe paper.

Este tutorial DIY mostra como fazer rosas com papel crepe.

Things you need:
- Crepe Paper (Light yellow and light green)
- Scissors
- Hot Glue
- Wire
- BBQ stick (or something to curl the petals)

DIY: Crepe Paper Flowers - Roses (Light yellow)
DIY: Crepe Paper Flowers - Roses (Pink)
DIY: Crepe Paper Flowers - Roses - Video

Unicorn Nail Art

Hey,
today's nail art is a cute and adorable unicorn nail art!
This nail art tutorial shows you a cute and adorable nail art design in pastels and one nail with a cute unicorn. You need a nail art brush and dotting tool.
Yay! I did a unicorn nail art! I started by applying a base coat. On my pinky, index and thumb finger nail I applied liquid latex around the nails and painted them white (1 coat). On my ring finger nail I painted two coats in light/pastel pink. On the middle finger using a nail art brush I drew the unicorn in white. While drying I moved to the white nails. I first put all the colours in a sponge but I didn't like how it turned out, so I used a little piece of sponge with the colour I wanted and dabbed onto the nail to create something that looks like an ombre. Over that colours I used a gold nail polish, that has small glitters. Back to the unicorn nail, I added the horn in gold, as well the inside of the ears. I outlined the horn and did the eyes in black. On the horn, using a dotting tool I made tiny flowers in pink, purple and peach, and a few green leaves. After the nails have dried, I applied a top coat!

Este tutorial mostra uma nail art fofa e gira em cores pastel e com um unicórnio. Precisa de um pincel de nail art e um dotting tool.

Products used:
- Flormar - Nail Care 4 in 1 Complete Care (Base Coat)
- Kiko - 506 - Venus Pink (Pastel Pink)
- Kiko - 203 - French Manicure White for Tips (White)
- Kiko - 330 - Lilac (Pastel Purple)
- Kiko - 085 - Mint Milk (Pastel Green)
- Kiko - 359 - Light Peach (Pastel Peach)
- Kiko - 525 - Metallic Pastel Blue (Pastel Blue)
- Kiko - 479 - Pearly Golden Sesame (Gold)
- BeautyBigBang - Gold Stamping Nail Polish
- Kiko - 275 - Black (Black)
- Cien - Base & Top Coat

Unicorn Nail Art
Unicorn Nail Art - Video

segunda-feira, 16 de julho de 2018

Fruit Nail Art: Cherry #3

Hey,
today's nail art is the third design of the fruit nail art series and also a collaboration with LifeWorldWomen.
This nail art tutorial shows you a cute and simple nail art design in red with white polka dots and two nails in mint blue with red cherries in a vintage look. You need a nail art brush and a dotting tool!
The third design of the fruit nail art series are cherries! I created a vintage look for this nail art, white polka-dots over red and cherries on a white flower over mint blue. I started by applying a base coat, then painted my nails red and ring and middle finger nails mint blue. On the red nails using a medium/small dotting tool I made white polka-dots. On the mint blue nails using a big dotting tool I created white flowers, by making a circle with 6 dots and a dot in the centre of the flower. On the white flowers I made two red dots and added a green line in each dot connecting on the top and then added a leaf. Around the white flowers using a tiny dotting tool, I made tiny white dots. After it has dried, I applied a top coat.

Este tutorial mostra uma nail art fácil e gira com cerejas e pontos brancos. Precisas de um pincel de nail art e um dotting tool.

Products used:
- Flormar - Nail Care 4 in 1 Complete Care (Base Coat)
- Cien - 3 Red (Red)
- Cien - 11 Mint (Mint Blue)
- Kiko - 203 - French Manicure White for Tips (White)
- Kiko - 343 - Spring Green (Green)
- Cien - Base & Top Coat


Fruit Nail Art: Cherry #3
Fruit Nail Art: Cherry #3 - Video